Sunday, March 31, 2013

DIY Drying Rack - How I did it (a sort of, not-quite, tutorial)

I'm back! well yeah I did update yesterday over on my doll blog, http://clover-tea.blogspot.sg/, but thought this entry would be appropriate in either blog, so here it is! March was supposed to be a busy month for me, commissions wise, but I did fall sick with the flu for quite sometime :( While drifting in and out of my medicated haze, I tried to figure out the best way to prepare for the commissions once I healed up. And on a rare family trip to Daiso (yes stuffy nose and all ha!), I raised the issue of having not enough horizontal space to dry my items, and asked my brother Ben if he could help with coming up with a solution to go vertical without having to install a large shelf or make more holes in the walls.....he suggested using a dish rack as the 'spine' to stack up the trays, since I couldn't get more of the stackable dish 'tables' i used previously to stack my stuff.

Since I'm always broke, I was on a tight budget, and Daiso seemed to have alot of possibilities for affordable solultions. the key things I was looking for was:

- Compact
- Portable
- Versatility
- Utility
- CHEAP

yeah tall order, right? looking around the City Square Mall branch, they had run out of the dish rack and so I thought, maybe I'll look around my neighbourhood hardware stores and perhaps i'll figure something else out. Fast forward a few weeks and while out with Asuka yesterday, we went on a scenic route (read: took the wrong bus) to Tampines from Stargek (they're having an Easter weekend 20% sale! ends today) and I managed to come to a decision on the rack idea since the wooden dish rack was available. ^ ^

I don't have step-by-step pictures, but it's so dead simple you can probably put it together faster than I did (i wasted 3 cable ties fiddling around with it to figure out the best configuration to hold it together).

Items used:
- 1 wooden dish rack
- 4 stainless steel trays
- cable ties, i used 12
- 1 plate stand

OPTIONAL
- standard army belt (huhuhu impulse purchase from pasir ris interchange)
Total cost: $12 from Daiso, cable ties I found lying about at home so I used those but you can probably get them from Daiso or a neighbourhood hardware store. belt was a gift from bf and meant for me to use on a different bag but whatever :P maybe i'll use my own 'fashion' belt since it's just sitting in my wardrobe hrmm.......

The only dismantling you need to do is on the plate stand. I chose the larger sized one, approx 17cm tall for this project and MADE IT WORK. just pull it apart at the hinge

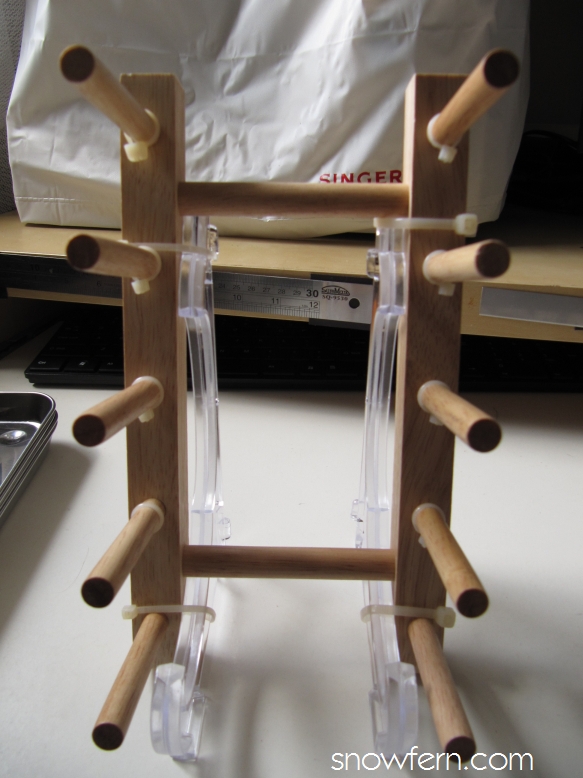
cable tie the two pieces to each 'trunk' of the dish rack. you can click on the photo for reference on where you can secure it. I've secured it this way so the angle will allow the trays to slot in pretty parallel to the ground.

me being clumsy all the time, I decided to add 'stoppers' to make the whole rig more secure. as you can see in the photo on the right, there is a slight gap for the tray to 'catch' on to. prevents accidental knocking or sliding of the trays. 


At this point, you should have a working rig/rack thing. however, the trays are pretty heavy and i didn't want to risk having it topple forward once they're filled, so i've secured it to my trolley with the army belt (THANK YOU BF!) left it with no room for movement, it's very snugly tied there ^ ^ Perfect spot too, since the trolley has coasters and the fan blows directly onto it (it's usually where I place my stuff to dry too!)

I suppose if you're putting it on a table you can maybe tuck a box or pencil case under the lowest rung to keep it from toppling forward, but until I find a need to do that, this will work for me :D

TADAH!~ super happy right now in spite of the pain. must be the painkillers' side effect HAHAHHAAHAHHA *delirious laughter*

anyway. hope you've found this useful, share with your friends! comment if you've made one for yourself, better yet, link your photos!
~~~~~~~~~~~~~~~~~~~~~~~~~~~~~~~~~~~~~~~~~~~~~~~~~~~~~~~~~

Notes:
- for the trays, it's up to you on whether you want the ones with holes or not, me, I work in a non-airconditioned environment + fan, so the humidity doesn't help with the drying process for my clay, so I thought better to have the ones with holes for better airflow, and I always lay my ADC items on paper napkins/serviettes to dry anyway so they won't fall through or stick to the tray, it's just for support. Also, this means I can also use the trays for baking my polymer clay XD YAY VERSATILITY
- you can probably use other sorts of racks or whatever, i chose this one cos it's at the perfect gap size for air to circulate, and for the size for most of my mini-items. that, and the combo of my favourite materials, clear plastic, wood + metal, all-in-1 = WOOT. maybe i should name this my 'frankendryingrig' hurhur
- ok i'm rambling. more than usual. painkillers definitely kicking in. BYE

THANKS TO BENJAMIN FOR COMING UP WITH THE IDEA! :D

Friday, March 8, 2013

Not much to update here...

but at the very least, Asuka and I managed to get some 1:12 suitcase prototypes done during our mini meet! Sans!' isn't pictured as she ran off with hers XD They aren't completed, but since it's been on our to-do list (since renamed 'bucketlist') for the longest time, I'm glad we finally hankered down to tackle it. I hope to find time to do more 1:12 items, haven't had much time to do anything other than a few minutes of candy crush saga when taking a break from commission work. catching the flu when i'm at my busiest doesn't help either T-T GRARGHHGH i hope it doesn't develop into another sinus infection!!!! maybe i really should get that operation (and a nose job while at it HURHURHUR) ((ok i'm kidding on the nose job thing)) (((OR AM I DUNDUNDUN!~~~~~~~~~~~~~~)))

*koff* well, since i also messed up my shoulder, and somehow my left elbow too.....the left elbow thing was bizarre!! I couldn't straighten it at all, felt as if the joint was wonky and niggly. you know how sometimes the joint just seems a little out of place, and random flicking motions can sometimes set it back in place? well this time, it didn't work. hurt like a sumb*tch. other choicier swear words escape me in my cold meds haze. probably why i'm also rambling in this post, BEST TIME TO WRITE HUH!! XD anyway elbow is pretty ok now after not being able to straighten it for a week, and shoulder is....well. it is what it is :(

Commission slots for March are closed (thank you!), April and May slots will be limited as I try to catch up on some larger (literally and figuratively) orders. I have been busy with the largest order I've ever received, all for 1:3 BJDs. I know I said I'd post the larger stuff over on the other blog, but I feel bad for neglecting this one, so......:S DOUBLE POST ON BOTH!!!!!! YAYYYYYYYYYYYYYYYYYYYYY

think i'd better grab more rest. i'm scaring myself. BUHBYE FOR NOW